Category
Objective-C中的Category就是对装饰模式的一种具体实现。它的主要作用是在不改变原有类的前提下,动态地给这个类添加一些方法。
先看一段代码,后面的关于Category的分析都是基于以下代码:
1 | // CategoryTestModel.h |
上面的代码声明了一个CategoryTestModel的类以及NN和Nero两个分类,接着我们使用如下命令将这些代码转化成C++代码:xcrun -sdk iphoneos clang -arch arm64 -rewrite-objc CategoryTestModel.m
Category的底层结构
在C++代码中,我们会发现有以下关键代码:
1 | // NN分类 |
从源码中可以知道,分类转化成了_category_t类型的结构体,并且有几个分类,就会对应生成几个这样的结构体。这里有一点要说明一下,在objc的代码中也可以找到关于分类的结构体介绍,结构体名叫category_t,并成员变量稍微有点差异,但是不影响对底层实现的学习。
_category_t的定义如下:
1 | struct _category_t { |
从代码中我们可以看出_category_t结构体中存放着类名,主类名,对象方法列表,类方法列表,协议列表,以及属性列表。
在我们声明的分类中,只有对象方法和类方法,所以我们看一下_method_list_t。_method_list_t的定义如下:
1 | // 对象方法存储 |
通过上面的一系列源码,我们知道了如下几点:
- Category的底层结构是一个
_category_t的结构体,我们在分类中声明的方法、属性等都会存在对应的字段中; - 有多少个分类就会有多少的
_category_t结构体。
到这里就不免会出现一个疑问:
在我们将代码转化成C++代码后,一个类有其主类_class_t还有N个_category_t的分类。主类方法存在主类的结构中,分类方法存在分类的结构体中。我们打印其方法列表的时候,分类方法也会打印出来,另外我们在日常开发中,有时也会使用分类去覆盖掉主类实现的方法,那这又是为什么?上面所讲的只是编译期的过程,Category的实现还依赖于Runtime。
这里插一个题外话,在日常开发的时候,在一些比较麻烦的时候我们可能会使用方法交叉,我们也知道方法交叉是比较危险的手段,还是少用为妙。而上面提到的使用分类去覆盖掉主类实现的方法也是能减少方法交叉的使用。
Category在运行时中
这里使用objc4-750.1的源代码,你可以通过这里下载。在objc-runtime-new.m中找到一个_read_images的函数,由于代码很长,这里只贴出关于分类的实现:
1 | void _read_images(header_info **hList, uint32_t hCount, int totalClasses, int unoptimizedTotalClasses) |
- 通过
_getObjc2CategoryList函数获取到分类列表; - 遍历分类列表获取其中的方法,协议,属性等;
- 调用
remethodizeClass(cls)函数对类对象(分类的主类)重新方法化; - 调用
remethodizeClass(cls->ISA());对类对象的元类重新方法化;
可以看到最终都调用了remethodizeClass函数,接着我们看一下remethodizeClass的实现:
1 | static void remethodizeClass(Class cls) |
remethodizeClass的实现主要依赖于attachCategories,从函数名我们可以知道这个函数,就是用来给类或者元类添加分类中存放的数据。attachCategories的实现如下:
1 | static void |
从上面的代码可以看到,方法、属性、协议的合并都使用了attachLists方法,其实现如下:
1 | void attachLists(List* const * addedLists, uint32_t addedCount) { |
关于上述关于合并的实现分成了三种情况,但是思想都接近,简单的说就是数组合并。分析这段代码是为了解释为什么我们可以在分类中重写方法来覆盖主类的实现。
这里我们就以分类方法在many lists -> many lists的情况下来分析一下这个流程。
- 首页分配一块内存用来数组扩容,扩容后的长度就是类对象的方法列表的长度加上分类方法列表的长度;
- 调用
memmove,将原来的方法列表向后拖动oldCount * sizeof(array()->lists[0])个位置; - 调用
memcpy,将分类方法列表拷贝在前面空出的位置。
用一张图表示下上面的情况: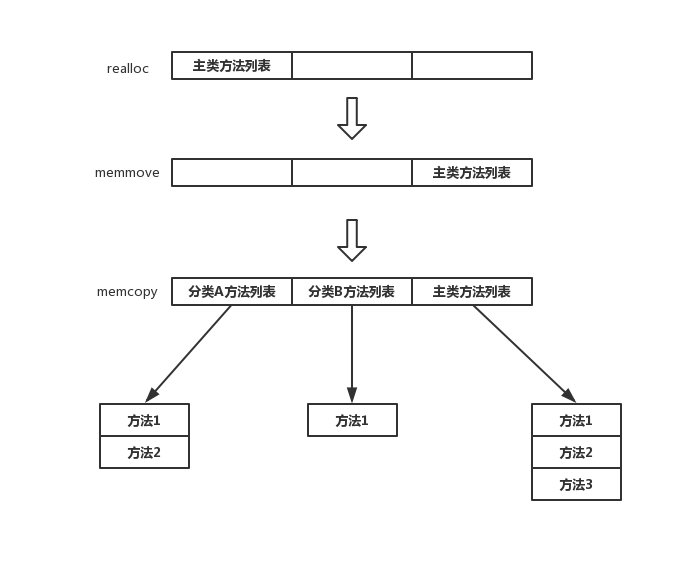
Categoty总结
这里再总结一下Categoty的一些知识点:
- Category在编译时期会转化成
_category_t的结构体,我们在分类中声明的方法、属性等都会存在对应的字段中; - 在程序运行时,runtime会将Category的数据合并到类对象或者元类对象中;
- 分类方法列表在主类方法列表的前面,所以分类的同名方法会被优先被调用或者分类中重写方法能覆盖主类的实现。
- 分类列表中越后面的分类即越后面参与编译的分类,其方法列表中的方法会越优先被调用。
- 分类中的属性也是在运行时的时候完成的,这要区别于Extension。Extension可以理解为将.h文件中的共有属性声明在.m中变成私有的,那这些属性也是在编译期完成的。所以Category和Extension的区别就是Extension在编译时期,它的数据就包含在类信息中,Category中的数据是在运行时才合并到类中。
但是有两个方法比较特殊,分别是load和initialize,它们的执行结果和一般方法有区别,所以单独拿出来分析。
load
首先看一段代码:
1 | // FatherA |
编译顺序如下: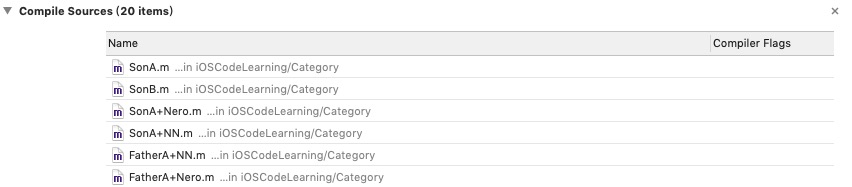
执行结果如下:
以FatherA为例,我们知道load方法会在runtime加载类、分类的时候进行调用,根据上面提到的分类会覆盖主类的同名方法(这里并不是真的覆盖,而是优先于主类先调用),load函数应该只是被调用一次,但是通过上面的代码我们看到load方法被调用了三次,这是为什么呢?
load方法的实现在objc-runtime-new.m中找到一个load_images的函数,其实现如下:
1 | // load_images |
上面代码的实现主要依赖于prepare_load_methods和call_load_methods。prepare_load_methods用来查找load方法并确定其调用顺序,call_load_methods用来调用load方法。
prepare_load_methods
我们先看一下prepare_load_methods的实现:
1 | void prepare_load_methods(const headerType *mhdr) |
prepare_load_methods的实现可以分为两个步骤:
- 获取所有的类,调用
schedule_class_load; - 获取所有的分类,调用
add_category_to_loadable_list,add_category_to_loadable_list将实现了+load方法的分类添加到loadable_categories数组的最后面,loadable_categories用来在call_load_methods进行分类+load方法的调用。
上面代码中,关于classlist和categorylist这两个数组中的元素的顺序是根据类或者分类被编译的顺序分别进入对应数组中的。
类load方法的调用顺序
确定类load方法的调用顺序,依赖于schedule_class_load,其实现如下:
1 | // schedule_class_load是一个递归函数 |
schedule_class_load是一个递归函数,它会沿着cls的父类一直往上查找知道NSObject,接着调用add_class_to_loadable_list将实现了+load方法的cls添加到loadable_classes的最后面。这也就解释了为什么父类的load方法为什么会优先于子类的load方法被调用。
接着再看一下add_class_to_loadable_list的实现:
1 | // 这个结构体中的method专门存放类中的+load方法 |
这个代码的作用就是通过传入的cls生成一个对应的loadable_class结构体,并将这个结构体加在loadable_classes的最后面,loadable_class这个结构体中的method专门存放类中的+load方法。
分类load方法的调用顺序
分类load方法的调用顺序就是遍历获取到的分类列表,通过add_category_to_loadable_list 将实现了+load方法的分类添加到loadable_categories数组的最后面。add_category_to_loadable_list的实现如下:
1 | // 这个结构体中的method专门存放分类中的+load方法 |
add_category_to_loadable_list函数和add_class_to_loadable_list函数的实现逻辑很相似,这个就不做说明了。
这里总结一下load方法的调用顺序:
- 对于重写了
+load方法的类来说,其load方法的调用顺序是先编译的类的父类 > 先编译的类 > 后编译的类的父类 > 后编译的类; - 对于重写了
+load方法的类来说,其load方法的调用顺序是谁先被编译,谁就优先被调用。
当确定好了load的调用顺序了以后,就需要调用load方法。
call_load_methods
接着我们看一下call_load_methods的实现:
1 | void call_load_methods(void) |
call_load_methods函数也是分为两个步骤:
- 使用
call_class_loads调用类的load方法; - 使用
call_category_loads调用分类的load方法。
call_class_loads
call_class_loads的实现如下:
1 | static void call_class_loads(void) |
call_class_loads函数通过遍历遍历loadable_classes列表调用+load方法,数组中越前面的元素越先被调用。通过load_method_t可以获取类的load方法,load_method_t的定义为:
1 | typedef void(*load_method_t)(id, SEL); |
load_method_t是指向函数的指针,相当于返回的是一个函数地址。获取到函数指针后,使用(*load_method)(cls, SEL_load);调用load方法。所以说,load方法的调用并不是使用消息发送机制,而是直接使用函数指针调用。
call_category_loads
call_category_loads用来调用分类的load方法,其实现如下:
1 | static bool call_category_loads(void) |
load总结
这里再总结一下load方法的一些知识点:
- load方法会在runtime加载类、分类的时候进行调用,不需要引入,只要被加载进内存就会被调用;
- 每一个类、分类的load,在程序运行过程中只会被调用一次;
- 先调用类的load方法,调用顺序:先编译的类的父类 > 先编译的类 > 后编译的类的父类 > 后编译的类;
- 再调用分类的load方法,调用顺序:谁先被编译,谁就优先被调用;
- load方法的调用本质是使用函数地址直接进行调用,而不是使用
objc_msgSend的方式。
initialize
initialize的测试代码如下:
1 | // FatherA |
我们知道initialize方法会在类第一次接收到消息的时候被调用,所以我们使用如下代码进行测试:
1 | // 测试代码 |
执行结果如下:
通过上面的代码可以知道:
- initialize方法会在类第一次接收到消息的时候被调用,所以类的initialize可能永远不会被调用;
- 父类的initialize会优先于子类被调用;
- 分类的initialize会覆盖掉主类的initialize(这也符合之前分类的方法调用顺序);
initialize的实现
initialize方法的实现在objc-runtime-new.m中找到一个lookUpImpOrForward的函数,其中有如下关键代码:
1 | if (initialize && !cls->isInitialized()) { |
在方法调用过程中,如果类没有被初始化的时候,会调用_class_initialize对类进行初始化,其中有两块关键代码:
1 | /*********************************************************************** |
_class_initialize方法会进行递归调用,由此可以确保父类优先于子类初始化。接着调用callInitialize函数,其实现如下:
1 | void callInitialize(Class cls) |
所以initialize的调用方式是objc_msgSend,它和普通方法一样是由Runtime通过发消息的形式。
initialize总结
这里再总结一下initialize方法的一些知识点:
- initialize方法会在类第一次接收到消息的时候被调用,所以类的initialize可能永远不会被调用;
- initialize调用顺序: 父类的initialize会优先于子类被调用,且分类的initialize会覆盖主类的initialize,那么就会对这个类中的实现造成覆盖;
- 如果子类没有实现initialize方法,那么继承自父类的实现会被调用即父类的initialize可能被调用多次;
- 如果我们想确保自己的
initialize方法只执行一次,避免多次执行可能带来的副作用时,我们可以使用下面的代码来实现:
1 | + (void)initialize { |
最后总结一下load和initialize区别
| / | load | initialize |
|---|---|---|
| 调用时机 | 加载到runtime时 | 收到第一条消息时,可能永远不调用 |
| 调用本质 | 函数地址调用 | objc_msgSend发送消息 |
| 调用顺序 | 父类 > 类 > 分类 | 父类 > 类 |
| 调用次数 | 一次 | 一次或者多次 |
| 分类的中实现 | 类和分类都执行 | “覆盖”主类中的实现 |